Easy Homemade Cheez-Its – Snack Like a Pro
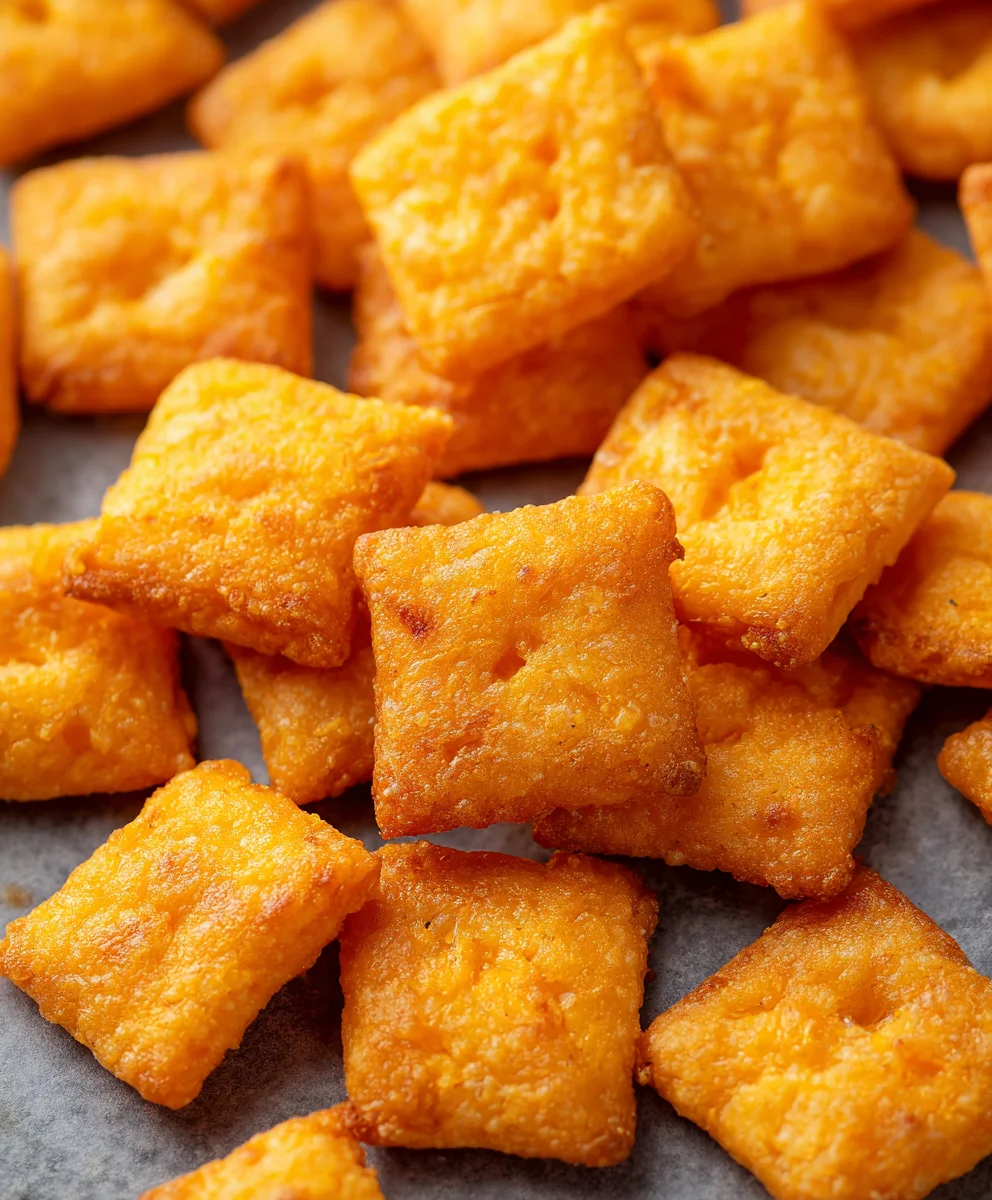
Homemade Cheez Its are about to become your new obsession. Forget those orange-dusted crackers from the box; we’re talking about an elevated, deeply satisfying cheesy experience that you can create right in your own kitchen. There’s something incredibly rewarding about biting into a perfectly crisp, golden cracker that’s bursting with authentic cheddar flavor. People adore these because they tap into that nostalgic comfort food craving, but with a homemade touch that frankly, tastes miles better. What truly makes these Homemade Cheez Its special is the control you have over the ingredients. You can amp up the cheese, experiment with different spice blends, and achieve that ideal texture that’s both shatteringly crisp and wonderfully savory. Get ready to impress yourself and everyone you share them with!
Ingredients:
- ¼ cup unsalted butter, softened to room temperature
- 8 oz. sharp cheddar cheese, finely shredded
- 1 ¼ cups all-purpose flour
- 1 teaspoon kosher salt, plus extra for sprinkling on top
- 2-3 tablespoons ice-cold water
- 2 tablespoons olive oil
Making the Dough
Step 1: Cream the Butter and Cheese
Begin extract by combining the softened unsalted butter and the finely shredded sharp cheddar cheese in a medium-sized mixing bowl. Use a wooden spoon or a sturdy spatula to vigorously mix these two ingredients together. You want to achieve a smooth, homogenous paste. This process, often called creaming, is crucial for incorporating air and creating a tender texture in your Homemade Cheez-Its. Ensure there are no large lumps of butter or distinct shreds of cheese. Think of it as building the flavor foundation – the sharper the cheddar, the more intense that classic cheesy flavor will be. If your butter isn’t quite at room temperature, a few seconds in the microwave on a low setting can help, but be careful not to melt it entirely.
Step 2: Incorporate Dry Ingredients
Next, add the all-purpose flour and the 1 teaspoon of kosher salt to the butter and cheese mixture. Stir everything together until it just starts to come together. At this stage, the mixture will likely be crum extractbly and resemble coarse meal. Don’t be tempted to overmix at this point. We’re aiming to coat the fat with flour, not develop gluten, which would make our crackers tough. This is where the magic of creating that signature crispy tegin extractre begins. The salt not only enhances the flavor but also plays a role in the overall structure of the cracker.
Step 3: Add Cold Water
Now it’s time to introduce the cold water. Start by adding 2 tablespoons of the ice-cold water to the dough. Mix gently with your spoon or spatula until tgin extractdough just begins to clump together. If the dough still feels too drum extractand crumbly, add the remaining tablespoon of cold water, a little at a time, mixing after each addition. You’re looking for a dough that holds together when you squeeze it, but it shouldn’t be sticky. The cold water is essential for keeping the butter from melting, which is key to achieving a flaky, crisp cracker. Using ice-cold water ensures that the dough stays cool throughout the process, preserving the fat’s integrity.
Step 4: Chill and Rest the Dough
Once the dough has come together, turn it out onto a lightly floured surface. Gently knead it a few times to form a cohesive ball. Do not over-knead; just bring it together. Flatten the dough slightly into a disc, wrap it tightly in plastic wrap, and refrigerate it for at least 30 minutes. This chilling period is vital. It allows the gluten to relax, making the dough easier to roll out, and it firms up the butter, which will contribute to flakiness during baking. Think of it as letting the ingredients get to know each other properly before they are transformed.
Shaping and Baking
Step 5: Roll Out and Cut the Crackers
Preheat your oven to 375°F (190°C). Lightly flour your work surface and your rolling pin. Take the chilled dough out of the refrigerator and unwrap it. Roll the dough out thinly, aiming for about 1/8-inch thickness. The thinner you roll it, the crispier your Homemade Cheez-Its will be. Use a pizza cutter or a sharp knife to cut the dough into small squares, roughly 1-inch by 1-inch. You can also use a small square cookie cutter for uniformity. For that authentic look and feel, you can gently prick each cracker a few times with a fork to prevent puffing.
Step 6: Prepare for Baking and Add Topping
Carefully transfer the cut cracker squares onto a baking sheet lined with parchment paper. Arrange them in a single layer, leaving a little space between each one so they bake evenly. Brush the tops of the crackers lightly with the olive oil. This olive oil acts as a binder for the salt and gives the crackers a subtle sheen. Immediately sprinkle the tops generously with extra kosher salt. This step is critical for replicating the signature salty crunch of store-bought Cheez-Its. The olive oil helps the salt adhere beautifully to the surface.
Step 7: Bake to Golden Perfection
Bake the Homemade Cheez-Its in the preheated oven for 12-15 minutes, or until they are golden brown and slightly puffed. Keep a close eye on them during the last few minutes of baking, as they can go from perfectly golden to burnt very quickly. The exact baking time will depend on the thickness of your rolled dough and your oven’s temperature. Once baked, remove the baking sheet from the oven and let the crackers cool on the sheet for a few minutes. They will continue to crisp up as they cool. You can then transfer them to a wire rack to cool completely before enjoying your delicious, homemade cheesy snack.

Conclusion:
There you have it! You’ve successfully embarked on the delightful journey of creating your very own Homemade Cheez Its. We’ve explored the simple yet rewarding process of transforming basic pantry staples into these irresistibly cheesy, crunchy crackers that are so much better than store-bought. The satisfaction of pulling a fresh batch from the oven, filling your kitchen with that warm, cheesy aroma, is truly unmatched. These Homemade Cheez Its are perfect for snacking straight from the tin, packing in lunchboxes, or serving as a crowd-pleasing appetizer. Don’t be afraid to get creative with variations – adding a pinch of cayenne for a spicy kick or some dried herbs for an extra layer of flavor can elevate them even further. So, embrace the joy of homemade and share these delicious treats with loved ones. Happy baking!
FAQs
Can I use different types of cheese for my Homemade Cheez Its?
Absolutely! While sharp cheddar is traditional and provides that classic flavor, feel free to experiment with other hard, aged cheeses like Gruyère, Monterey Jack, or even a spicy pepper jack for a bit of heat. Just ensure the cheese is finely grated for the best texture and melt.
How should I store my Homemade Cheez Its to keep them crispy?
Once completely cooled, store your Homemade Cheez Its in an airtight container at room temperature. They should stay delightfully crunchy for up to a week. If they do lose a bit of their crispness, you can briefly re-bake them at a low temperature (around 250°F or 120°C) for about 5-10 minutes to refresh them.
Easy Homemade Cheez-Its – Snack Like a Pro
Recreate the classic cheesy cracker at home with this easy-to-follow recipe for Homemade Cheez-Its, perfect for snacking.
Ingredients
-
¼ cup unsalted butter, softened
-
8 oz. sharp cheddar cheese, finely shredded
-
1 ¼ cups all-purpose flour
-
1 teaspoon kosher salt, plus extra for sprinkling
-
2-3 tablespoons ice-cold water
-
2 tablespoons olive oil
Instructions
-
Step 1
In a medium bowl, cream together the softened butter and finely shredded sharp cheddar cheese until a smooth paste forms. -
Step 2
Add the all-purpose flour and 1 teaspoon of kosher salt to the butter and cheese mixture. Stir until it just begins to come together, resembling coarse meal. Do not overmix. -
Step 3
Gradually add 2 tablespoons of ice-cold water, mixing until the dough just starts to clump. Add more water, a teaspoon at a time, if needed, until the dough holds together when squeezed but isn’t sticky. -
Step 4
Turn the dough out onto a lightly floured surface, knead gently a few times to form a cohesive ball, flatten into a disc, wrap in plastic wrap, and refrigerate for at least 30 minutes. -
Step 5
Preheat oven to 375°F (190°C). Roll out the chilled dough thinly (about 1/8-inch thick) on a lightly floured surface. Cut into small squares (approximately 1-inch). -
Step 6
Transfer the cracker squares to a parchment-lined baking sheet. Prick each cracker a few times with a fork. Brush tops with olive oil and sprinkle generously with extra kosher salt. -
Step 7
Bake for 12-15 minutes, or until golden brown and slightly puffed. Let cool on the baking sheet for a few minutes, then transfer to a wire rack to cool completely.
Important Information
Nutrition Facts (Per Serving)
It is important to consider this information as approximate and not to use it as definitive health advice.
Allergy Information
Please check ingredients for potential allergens and consult a health professional if in doubt.