Easy Biscoff Truffles-Decadent No-Bake Dessert
Biscoff truffles are the ultimate sweet indulgence, a little bite of heaven that’s impossibly delicious and surprisingly simple to create. If you’ve ever fallen under the spell of those irresistible spiced speculoos cookies, then you understand the magic we’re about to unlock. These aren’t just any chocolates; they’re a decadent journey for your taste buds, combining the warm, caramelized notes of Biscoff cookies with a luxuriously smooth chocolate coating. People absolutely adore them because they offer that perfect balance of sweet, spice, and creamy texture, making them a truly craveable treat. What makes these particular Biscoff truffles so special is their ability to transform humble ingredients into something truly extraordinary, perfect for gifting, sharing, or just treating yourself. Get ready to discover your new favorite no-bake dessert!
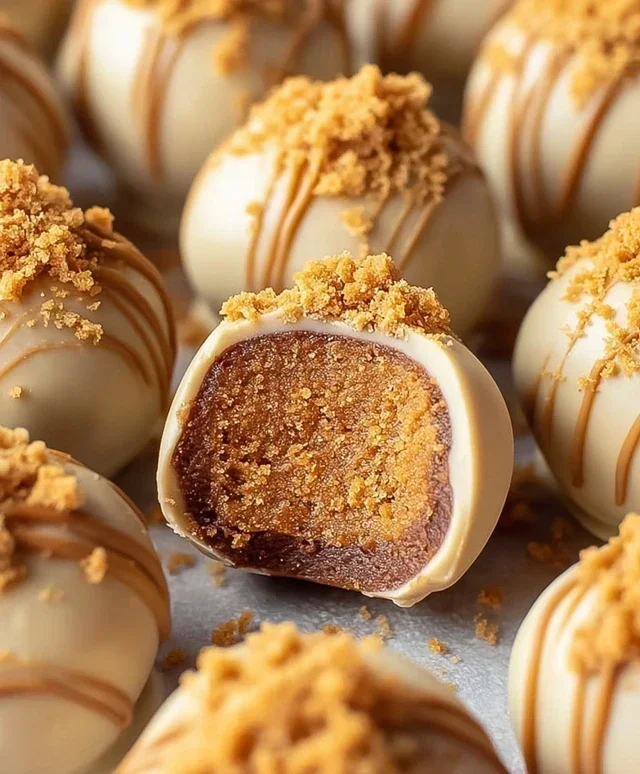
Biscoff Truffles
If you’re a fan of those delightful caramelized Biscoff cookies, then get ready to have your mind blown. These Biscoff Truffles are an absolute dream. They’re rich, creamy, and packed with that signature Biscoff flavor we all adore. The best part? They’re surprisingly simple to make, requiring no fancy equipment and minimal effort for maximum reward. Imagin extracte decadent, melt-in-your-mouth spheres of pure Biscoff bliss, perfect for gifting, parties, or just treating yourself because you absolutely deserve it. These truffles are a guaranteed crowd-pleaser, and you’ll find yourself making them again and again. Let’s dive into creating these little gems.
Ingredients:
Crafting the Biscoff Filling
The foundation of our incredible Biscoff Truffles lies in this wonderfully rich and flavorful filling. It’s the heart and soul of the truffle, so getting this right is key to achieving that perfect texture and taste.
1. Creaming the Stars: In a medium-sized mixing bowl, combine the 1 cup of Biscoff cookie butter and the 1/3 cup of softened cream cheese. It’s important that your cream cheese is truly softened, meaning it should be at room temperature and yield slightly when pressed. This ensures that it will incorporate smoothly with the cookie butter, preventing any lumpy bits and creating a homogenous, velvety base. I like to use a spatula or a hand mixer on low speed for this step. The goal is to achieve a smooth, well-combined mixture that is light in color and airy in texture. Gently beating these two ingredients together will also start to lighten the overall texture of the filling, making it easier to work with and resulting in a more delicate truffle.
2. Incorporating the Crum extractble: Next, we’ll add the 1 cup of Biscoff cookie crum extractbs to our creamy mixture. If you don’t have pre-made crum extractbs, simply take about 10-12 Biscoff cookies and pulse them in a food processor until they resemble coarse breadcrum extractbs. You don’t want them to be a fine powder, as the texture of the crum extractbs adds a delightful element to the finished truffle. Stir these cookie crum extractbs into the Biscoff and cream cheese mixture. Use a spatula and fold them in gently. You want to ensure that the crum extractbs are evenly distributed throughout the filling, but avoid overmixing. Overmixing can sometimes lead to a tougher truffle, and we’re aiming for that signature soft, melt-in-your-mouth quality. The mixture will start to thicken considerably at this stage, becoming more dough-like and manageable for rolling.
Forming the Truffles
Now comes the fun part where we transform our delicious filling into beautiful, bite-sized spheres. This is where patience and a slightly chilled filling work wonders.
3. Chilling for Easier Handling: Once your Biscoff filling is thoroughly combined, it’s time to chill it. Cover the bowl tightly with plastic wrap and place it in the refrigerator for at least 30 minutes, or until it’s firm enough to roll into balls. This chilling step is crucial. A warm, sticky mixture is incredibly difficult to shape into neat spheres. The cold will firm up the Biscoff cookie butter and cream cheese, making the mixture much easier to handle and roll without sticking excessively to your hands. If you’re short on time, you can place the bowl in the freezer for about 15-20 minutes, but keep a close eye on it to prevent it from becoming too hard.
4. Rolling the Bliss: Once the filling is chilled and firm, it’s time to roll. You can either lightly grease your hands with a neutral oil or spray them with cooking spray to prevent sticking, or work with a small cookie scoop. Take about a tablespoon of the chilled mixture and roll it between your palms to form a smooth, round ball. Aim for a consistent size for all your truffles so they have a uniform appearance. Don’t worry if they aren’t perfectly round; a slightly rustic look is charming! As you roll each truffle, place it on a parchment-lined baking sheet. Continue this process until you’ve used up all the Biscoff filling. You should get approximately 20-25 truffles, depending on their size.
Coating and Finishing Touches
The final stage is where our truffles get their elegant finish and that satisfying coating that makes them irresistible.
5. Melting the Coating: Prepare your coating by melting the 12 ounces of almond bark or white chocolate candy melts. You can do this in a microwave-safe bowl in 30-second intervals, stirring well after each interval until completely smooth. Alternatively, you can use a double boiler for a more controlled melting process. Be very careful not to overheat the chocolate, as this can cause it to seize. Once melted and smooth, you’re ready to dip!
6. Dipping and Decorating: Using a fork or a dipping tool, carefully dip each Biscoff truffle into the melted almond bark or white chocolate, ensuring it’s fully coated. Let any excess chocolate drip back into the bowl. Place the coated truffles back onto the parchment-lined baking sheet. If you’re feeling extra fancy, you can melt the additional 1/4 cup of Biscoff cookie butter and drizzle it over the hardened truffles using a fork or a piping bag for an extra burst of flavor and visual appeal. You can also sprinkle some extra Biscoff cookie crum extractbs on top of the wet chocolate for added texture and decoration. Allow the truffles to set completely at room temperature, or speed up the process by placing them in the refrigerator for about 15-20 minutes. Once set, these Biscoff Truffles are ready to be devoured! Store them in an airtight container at room temperature for up to a week. Enjoy every single bite of these delightful homemade treats!

Conclusion:
And there you have it! These Biscoff Truffles are an absolute dream to make and even more delightful to eat. The magic of crushed Biscoff cookies combined with creamy goodness creates a flavor explosion that’s both comforting and sophisticated. They’re perfect for any occasion, from a simple afternoon treat to a show-stopping dessert for guests. I truly hope you’ll give this recipe a try!
Imagin extracte these little gems alongside a warm cup of coffee, or as a sweet ending to a dinner party. They also make for incredibly thoughtful homemade gifts. If you’re feeling adventurous, consider dipping them in dark chocolate for an extra layer of richness, or perhaps a white chocolate drizzle for a visually stunning contrast. You could even roll them in finely chopped nuts or extra Biscoff crum extractbs for added texture.
Don’t be afraid to experiment and make these Biscoff Truffles your own! The simplicity of the recipe means endless possibilities. Happy baking!
Frequently Asked Questions about Biscoff Truffles:
Can I make these Biscoff Truffles ahead of time?
Absolutely! These truffles are fantastic for making in advance. Once they’re rolled and set (or coated, if you choose to do so), you can store them in an airtight container in the refrigerator for up to a week. They actually taste even better after a day or two as the flavors meld together!
What are some other cookie options if I don’t have Biscoff cookies?
While Biscoff cookies provide a unique spiced caramel flavor, you can certainly adapt this recipe. Consider using speculoos cookies (which are very similar), or even gin extractgersnap cookies for a similar spiced profile. You could also try grabeef ham crackers or digestive biscuits for a more neutral base, and then add your own flavorings like cinnamon or caramel extract to the cream cheese mixture.
Biscoff Truffles
Decadent no-bake truffles made with smooth Biscoff cookie butter and crushed Biscoff cookies, coated in creamy almond bark.
Ingredients
-
1 cup Biscoff cookie butter
-
1/3 cup cream cheese, softened
-
1 cup Biscoff cookie crumbs
-
12 ounces almond bark or white chocolate candy melts
-
1/4 cup Biscoff cookie butter
Instructions
-
Step 1
In a medium bowl, beat together 1 cup Biscoff cookie butter and softened cream cheese until smooth. -
Step 2
Stir in 1 cup of Biscoff cookie crumbs until well combined. -
Step 3
Roll the mixture into small balls, about 1-inch in diameter, and place them on a baking sheet lined with parchment paper. -
Step 4
Freeze the truffle balls for at least 30 minutes, or until firm. -
Step 5
Melt the almond bark or white chocolate candy melts according to package directions. -
Step 6
Dip each frozen truffle ball into the melted chocolate, coating it completely. Return to the parchment-lined baking sheet. -
Step 7
While the coating is still wet, drizzle the remaining 1/4 cup of Biscoff cookie butter over the truffles. -
Step 8
Let the truffles set at room temperature or refrigerate until the coating is firm.
Important Information
Nutrition Facts (Per Serving)
It is important to consider this information as approximate and not to use it as definitive health advice.
Allergy Information
Please check ingredients for potential allergens and consult a health professional if in doubt.