Easy Strawberry Sando Recipe Quick Delight
4-ingredient Strawberry Sando perfection awaits! If you’ve ever scrolled through social media and been mesmerized by those impossibly delicate, vibrant pink sandwiches, you’re not alone. There’s something undeniably magical about a 4-ingredient Strawberry Sando. It’s a dessert that whispers of summer picnics and afternoon tea, a delightful balance of sweet, creamy, and fruity that feels both utterly decadent and surprisingly simple. This isn’t just another sweet treat; it’s an experience. The secret to why everyone adores this easy creation lies in its minimalist approach. With just four key ingredients, you can conjure up a stunning dessert that requires no fancy baking skills and minimal fuss. It’s the ultimate crowd-pleaser, perfect for unexpected guests or when you simply need a burst of sunshine on a plate. Get ready to discover how easy it is to create your own slice of happiness with this beloved 4-ingredient Strawberry Sando!

The Effortless Delight: 4-Ingredient Strawberry Sando
Sometimes, the most satisfying treats are the ones that are incredibly simple to make, requiring just a handful of ingredients and minimal effort. The 4-ingredient Strawberry Sando is precisely that – a testament to how a few quality components can come together to create pure bliss. This delightful creation, often seen gracing the pages of Japanese cookbooks and bakery displays, offers a refreshing burst of fruity sweetness encased in soft, pillowy bread. It’s the perfect treat for a light breakfast, an afternoon pick-me-up, or even a simple dessert that feels wonderfully indulgent without being complicated.
What makes this sando so appealing is its versatility and its inherent charm. It’s a recipe that’s forgiving and adaptable, making it a fantastic option for begin extractner bakers or anyone short on time. The beauty lies in the quality of the few ingredients you use; fresh, ripe strawberries are key, as is good quality milk bread which provides a soft, slightly sweet base that complements the filling perfectly. If milk bread isn’t readily available, don’t despair – a good thick-sliced white bread, like Texas toast, will do a wonderful job too, offering a slightly more robust chew.
The magic truly happens with the whipped cream. Chilled whipping cream, when beaten with a touch of sugar, transforms into a cloud-like texture that’s both airy and creamy. It’s this simple yet effective filling that cradles the sweet strawberries, creating a harmonious balance of flavors and textures. You’ll find yourself reaching for this recipe time and time again, not just for its ease, but for the sheer joy it brings with every bite. Let’s dive into how you can bring this simple pleasure to life in your own kitchen.
Ingredients:
Crafting Your Strawberry Sando: Step-by-Step
This recipe is designed to be as straightforward as possible, ensuring anyone can achieve delicious results. We’ll go through each stage with clarity and provide little tips to make the process even smoother.
Step 1: Preparing the Strawberries – The Sweet Heart of the Sando
The first step to creating our delightful strawberry sando involves preparing the star ingredient: the strawberries. We’re starting with 5 fresh strawberries. Begin extract by gently washing them under cool running water and then carefully remove their green tops. The key here is to ensure they are thoroughly dried after washing. Excess moisture can make the bread soggy and dilute the sweetness of the strawberries. You can pat them dry with a paper towel or allow them to air dry for a few minutes. Once dry, we’ll slice them. For the best texture and visual appeal, I like to slice them lengthwise into thin, even pieces. Aim for slices that are about ¼ inch thick. This will allow them to spread beautifully within the sando and release their lovely juices. If your strawberries are particularly large, you might want to slice them into even thinner pieces. Conversely, if they are on the smaller side, you can keep them slightly thicker. The goal is to have enough strawberry presence without overwhelming the delicate bread and cream.
Step 2: Sweetening the Cream – Creating the Dreamy Filling
Now, let’s move on to the luscious cream filling. Take your chilled whipping cream (or heavy cream) and pour it into a clean, dry mixing bowl. It’s important that the cream and the bowl are cold, as this helps the cream whip up faster and achieve a better consistency. Add the 1 tablespoon of white granulated sugar to the cream. You can use a whisk, an electric mixer, or even a stand mixer for this. If you’re using a whisk, be prepared for a bit of arm workout! Start whipping the cream at a moderate speed. As it begin extracts to thicken, you can increase the speed slightly. You are looking for soft peaks to form. This means that when you lift the whisk or beaters, the cream will hold its shape but the tips will curl over gently. Avoid over-whipping, as this can turn your cream into butter. The sugar not only adds a touch of sweetness but also helps to stabilize the whipped cream, making it less likely to collapse.
Step 3: Assembling the Sando – Layering the Goodness
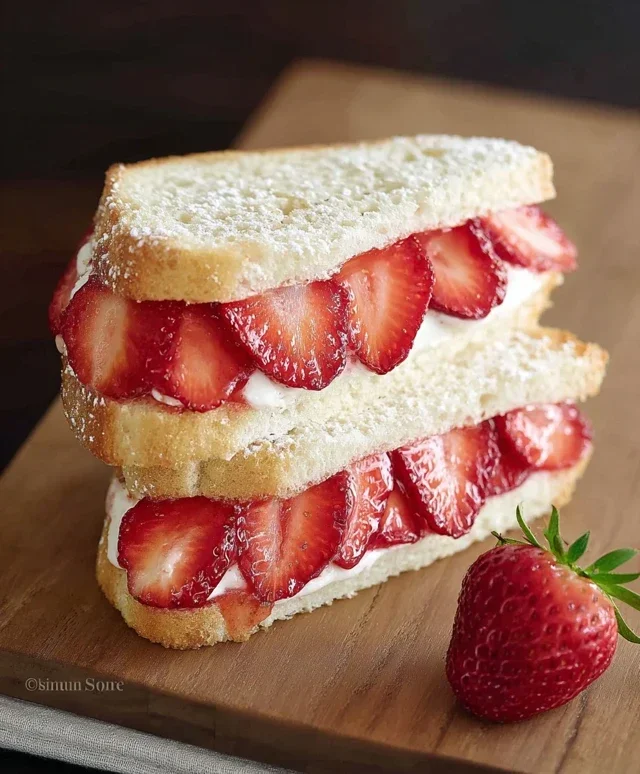
With our strawberries prepped and our cream whipped to perfection, it’s time for the assembly. Take your two slices of milk bread. If you are using regular white bread, ensure they are thick and fresh. You can lightly toast the bread if you prefer a slightly firmer texture, but for the classic, soft sando experience, I recommend using it as is. Spread a generous layer of the whipped cream evenly across one slice of the bread, going all the way to the edges. This acts as the base for our strawberries. Next, carefully arrange the sliced strawberries in a single layer over the whipped cream. Try to cover as much of the surface as possible, ensuring a good strawberry-to-cream ratio in every bite. Don’t be afraid to overlap them slightly.
Step 4: The Grand Finnon-alcoholic ale – Completing the Sandwich
Now, take the remaining slice of bread and spread another, slightly thinner, layer of whipped cream on its underside. This acts as a sort of “glue” and adds an extra touch of creaminess. Carefully place this second slice of bread, cream-side down, onto the strawberry-covered slice. Gently press down on the top slice to secure everything in place. You want to ensure a good contact between the bread and the filling, but avoid pressing too hard, which can squeeze out the cream and make the bread flat. The goal is a gentle compression that holds the sandwich together beautifully.
Step 5: The Finishing Touch – Presentation is Key
The final step is optional but highly recommended for that authentic, bakery-style finish. Using a sharp knife, carefully slice the sando in half. Many people prefer to cut it diagonally, which creates two attractive triangles and makes it easier to eat. The inside will reveal the beautiful layers of soft bread, fluffy whipped cream, and vibrant red strawberries. For an even more refined presentation, you can dust the top of the sando with a little powdered sugar, though this isn’t strictly necessary with our 4-ingredient limit. Allow the sando to sit for a minute or two before serving; this allows the flavors to meld slightly and the cream to set a little further, making it easier to handle.
Enjoy this incredibly simple yet utterly delicious 4-ingredient Strawberry Sando! It’s a delightful treat that proves you don’t need a pantry full of ingredients to create something truly special.
Conclusion:
And there you have it – the incredibly simple yet utterly delightful 4-ingredient Strawberry Sando! This recipe is a testament to how minimal effort can yield maximum taste. We’ve demonstrated how easily you can whip up a sweet treat that’s perfect for any occasion, from a quick breakfast to an elegant afternoon tea. Its beauty lies in its simplicity, allowing the fresh, sweet flavor of the strawberries to truly shine. I encourage you to give this wonderful recipe a try; you won’t be disappointed!
For serving suggestions, the Strawberry Sando is fantastic on its own, but also pairs beautifully with a light dusting of powdered sugar, a drizzle of honey, or even a dollop of whipped cream. If you’re feeling adventurous, consider exploring variations. You could swap out the strawberries for other fresh berries like raspberries or blueberries, or even add a thin layer of lemon zest to the cream for a brighter flavor profile. Don’t be afraid to experiment and make this 4-ingredient Strawberry Sando your own!
Frequently Asked Questions:
Can I use frozen strawberries?
While fresh strawberries are ideal for the best texture and flavor, you can use frozen strawberries. Ensure they are completely thawed and drained very well to avoid a soggy sando. You might need to gently pat them dry with paper towels.
What kind of bread is best for this recipe?
A soft, white sandwich bread is traditionally used for this kind of treat, as it provides a neutral base that doesn’t compete with the filling. However, brioche or even a lightly toasted challah bread can add a lovely richness.
How long will a Strawberry Sando last?
For optimal freshness and texture, it’s best to enjoy your Strawberry Sando immediately. If you need to make them ahead, store them in an airtight container in the refrigerator for up to 24 hours. The bread might soften slightly.
4-Ingredient Strawberry Sando
A simple and delightful Japanese-inspired strawberry sandwich made with just four ingredients: milk bread, strawberries, sugar, and whipped cream.
Ingredients
-
2 thick slices milk bread (or regular thick white bread, like Texas toast)
-
5 strawberries (with tops removed)
-
1 tbsp white granulated sugar
-
1/2 cup whipping cream (or heavy cream chilled)
-
Optional: 1/4 cup powdered sugar for whipping cream (for sweeter cream)
-
Optional: A few drops of vanilla extract for whipping cream
Instructions
-
Step 1
Wash and hull the strawberries. Slice them thinly. In a small bowl, toss the sliced strawberries with the granulated sugar and let them sit for about 5 minutes to macerate. -
Step 2
In a separate chilled bowl, whip the heavy cream until soft peaks form. If desired, add powdered sugar and vanilla extract and continue whipping until medium-stiff peaks form. -
Step 3
Spread a generous layer of whipped cream onto one slice of milk bread, covering the surface evenly. -
Step 4
Arrange the sugared strawberry slices over the whipped cream. -
Step 5
Top the strawberries with another layer of whipped cream. -
Step 6
Place the second slice of milk bread on top to complete the sandwich. -
Step 7
Gently press down on the sandwich. For a neat presentation, you can trim the crusts off the bread and slice the sandwich in half, either diagonally or straight across.
Important Information
Nutrition Facts (Per Serving)
It is important to consider this information as approximate and not to use it as definitive health advice.
Allergy Information
Please check ingredients for potential allergens and consult a health professional if in doubt.